Omnis Technical Note TNEX0006 Updated July 2023
Using the JavaScript Worker Object and Node.JS
For Omnis Studio 10.x or above
By Andrei Augustin, Software Engineer
In this Tech Note we will be exploring the JavaScript Worker introduced in Omnis Studio 10.
What is it?
With version 10 of Omnis Studio, we now have introduced node.js in the backend to support our remote debugger. In order to take full advantage of node.js' capabilities, we have created a new OW3 Worker Object: the JavaScript worker. With this new worker, you can run node.js "modules" very easily and it enables you, the developer, to extend your Omnis Studio application to a point that was not easily reachable before!
What is Node.js?
Node.js is an open-source server environment based on Google Chrome's V8 JavaScript engine which is also cross-platform, allowing you to run it virtually anywhere, similar to your Omnis application. What this means is that you can run JavaScript code in this environment that is running in the background alongside your Omnis application (yes you can turn it off if you wish to) and take full advantage of all the packages created for Node.js (there are many, and they are very useful!).
Node.js makes use of 'npm' which stands for node package manager. Many people that have used Linux before can compare it to the usual 'apt-get' command, or for the macOS user, it is similar to Homebrew's 'brew' command. What it allows us to do is install modules for Node.js very easily with a simple command in our terminal: npm install *name of package*.
Now the real question comes: what is a node.js module? You can think of a Node.js module as an Omnis object class. It has methods and functions which will run in the Node.js environment. You can call a Node.js module and its method from within Omnis, you can also pass parameters to it and return results back to Omnis. We will have three examples in this TechNote, the first example is going to get you familiar with what we are working with and will give you insight into what happens in the background. The second example will show you how to install an npm module and make a request to that module from within Studio (some files are already pre-written in the installation in order to facilitate this). While the third example is for those who have some coding experience (not necessarily years) and feel confident to dive straight into the action and install an npm module, write some JavaScript to connect Omnis to the npm module and call the module from within Omnis and return some data back.
How to use the JavaScript worker?
The first step to use the JavaScript worker is to create it using an object variable with the sub-type of OW3 Worker Objects\JAVASCRIPTWorker:

Or alternatively, we can subclass the external object with an Omnis object class:
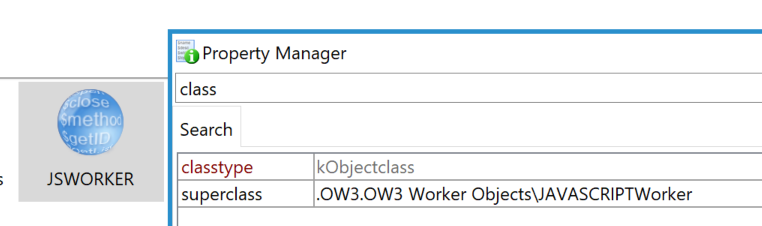
The JavaScript Worker has a bunch of useful methods that we can call:
$init([cPath, bDebugNodeJs=kFalse]) This method can be used to initialise the object so it is ready to execute JS method calls, it will return true if successful. You must call the $init method before any other methods.
$start() This method will run the JS worker in the background thread, return true if the worker was successfully started. Upon calling this method, the background thread will start a node.js process which will go through the JavaScript method calls. You can make multiple method calls to the same process, so there is no need to call the $start method that frequently results in minimal overhead of starting the node.js process.
$cancel() This method can be used to terminate the node.js process. When called, any in-progress method calls may not complete.
$callmethod(cModule, cMethod, vListOrRow [,bWait=kFalse, &cErrorText]) This method will call the method passed as a parameter and it can also pass a parameter to the JS method in the JavaScript object representation of vListOrRow. Optionally, we can also wait for the method to complete. This method returns true if successful.
The cModule and cMethod parameters identify a module and a method within the specified module which will be called.
The vListOrRow parameter will be converted to JSON and then passed to the JavaScript method as its parameter. This means that you should be careful to map the data correctly to JSON and avoid trying to pass that to $callmethod in vListOrRow. One other thing to be careful about is to pass a list or row, even if empty, each time so that Node.js will have an object to work on!
bWait is used to determine if you wish to suspend code execution until the Node.js method completes, therefore if you set it to wait by sending kTrue, a completion callback will occur before $callmethod returns true or false for its completion. In the end, cErrorText will simply receive the text describing the error if $callmethod fails.
And then we have the following callback methods:
$cancelled You can override this method in order to receive a notification that the request to cancel the worker has succeeded.
$workererror(wError) You can override this method to receive report of errors from the worker that are not related to calling a JavaScript method e.g. failure to start node.js. Please note that the worker thread will exit after generating this notification. Also, wError has 2 columns, an integer named errorCode and a character string named errorInfo.
$methoderror(wError) This method can be overridden and it can be used to receive report of the failure of an attempt to call a method with $callmethod. wError will have two columns, an integer named errorCode and a character string named errorInfo.
$methodreturn(wReturn) This method will get called and will get the results from a call to $callmethod. wReturn is a row variable. In case the JS method returns an object, this will be the Omnis equivalent of the object, created by converting the JSON to a row. In case the JS returns some other data such as a picture, this is a row with a single column named content, which will contain the data returned by the method.
If you are subclassing the JavaScript Worker in an object class, you can overwrite the callback methods. Alternatively, if you are using the JavaScript Worker as an object variable, you can call the method iJSWorker.$callbackinst.$assign($cinst) in order to set the current instance as the callback instance for the JavaScript Worker and you can create new methods for the callback methods in the class you are working on:

Now that we are familiar with what we are going to work with, let's get to the examples.
The first step for both examples is get npm. Unfortunately, the Node.js that comes with Omnis Studio 10 does not come with npm installed. Because of that, we will have to install Node.js on the computer we are working on which will automatically install npm for us as well.
In order to install it, you can either download the installer from their website: https://nodejs.org/en/download/ or if you are on macOS and use Homebrew, you can do brew install node.
After we have done this step, we can dive into our examples.
Example 1
In this first example, we will introduce you to the omnis_modules.js file in the jsworker folder in the writable directory of your Omnis Studio installation and make a request to a node module which already exists in our installation. The writable directory is usually AppData for Windows and Application Support for macOS.
So let's first take a look at the contents of our omnis_modules.js file which specifies the modules available to Omnis. You can think of the omnis_modules.js as a 'bridge' or 'interface' between Omnis and the Node.js modules. This will be the first point that gets hit when we call a method, in fact it will first verify if the module we specified in our $callmethod is available and if it is not defined in here, it will return an error.
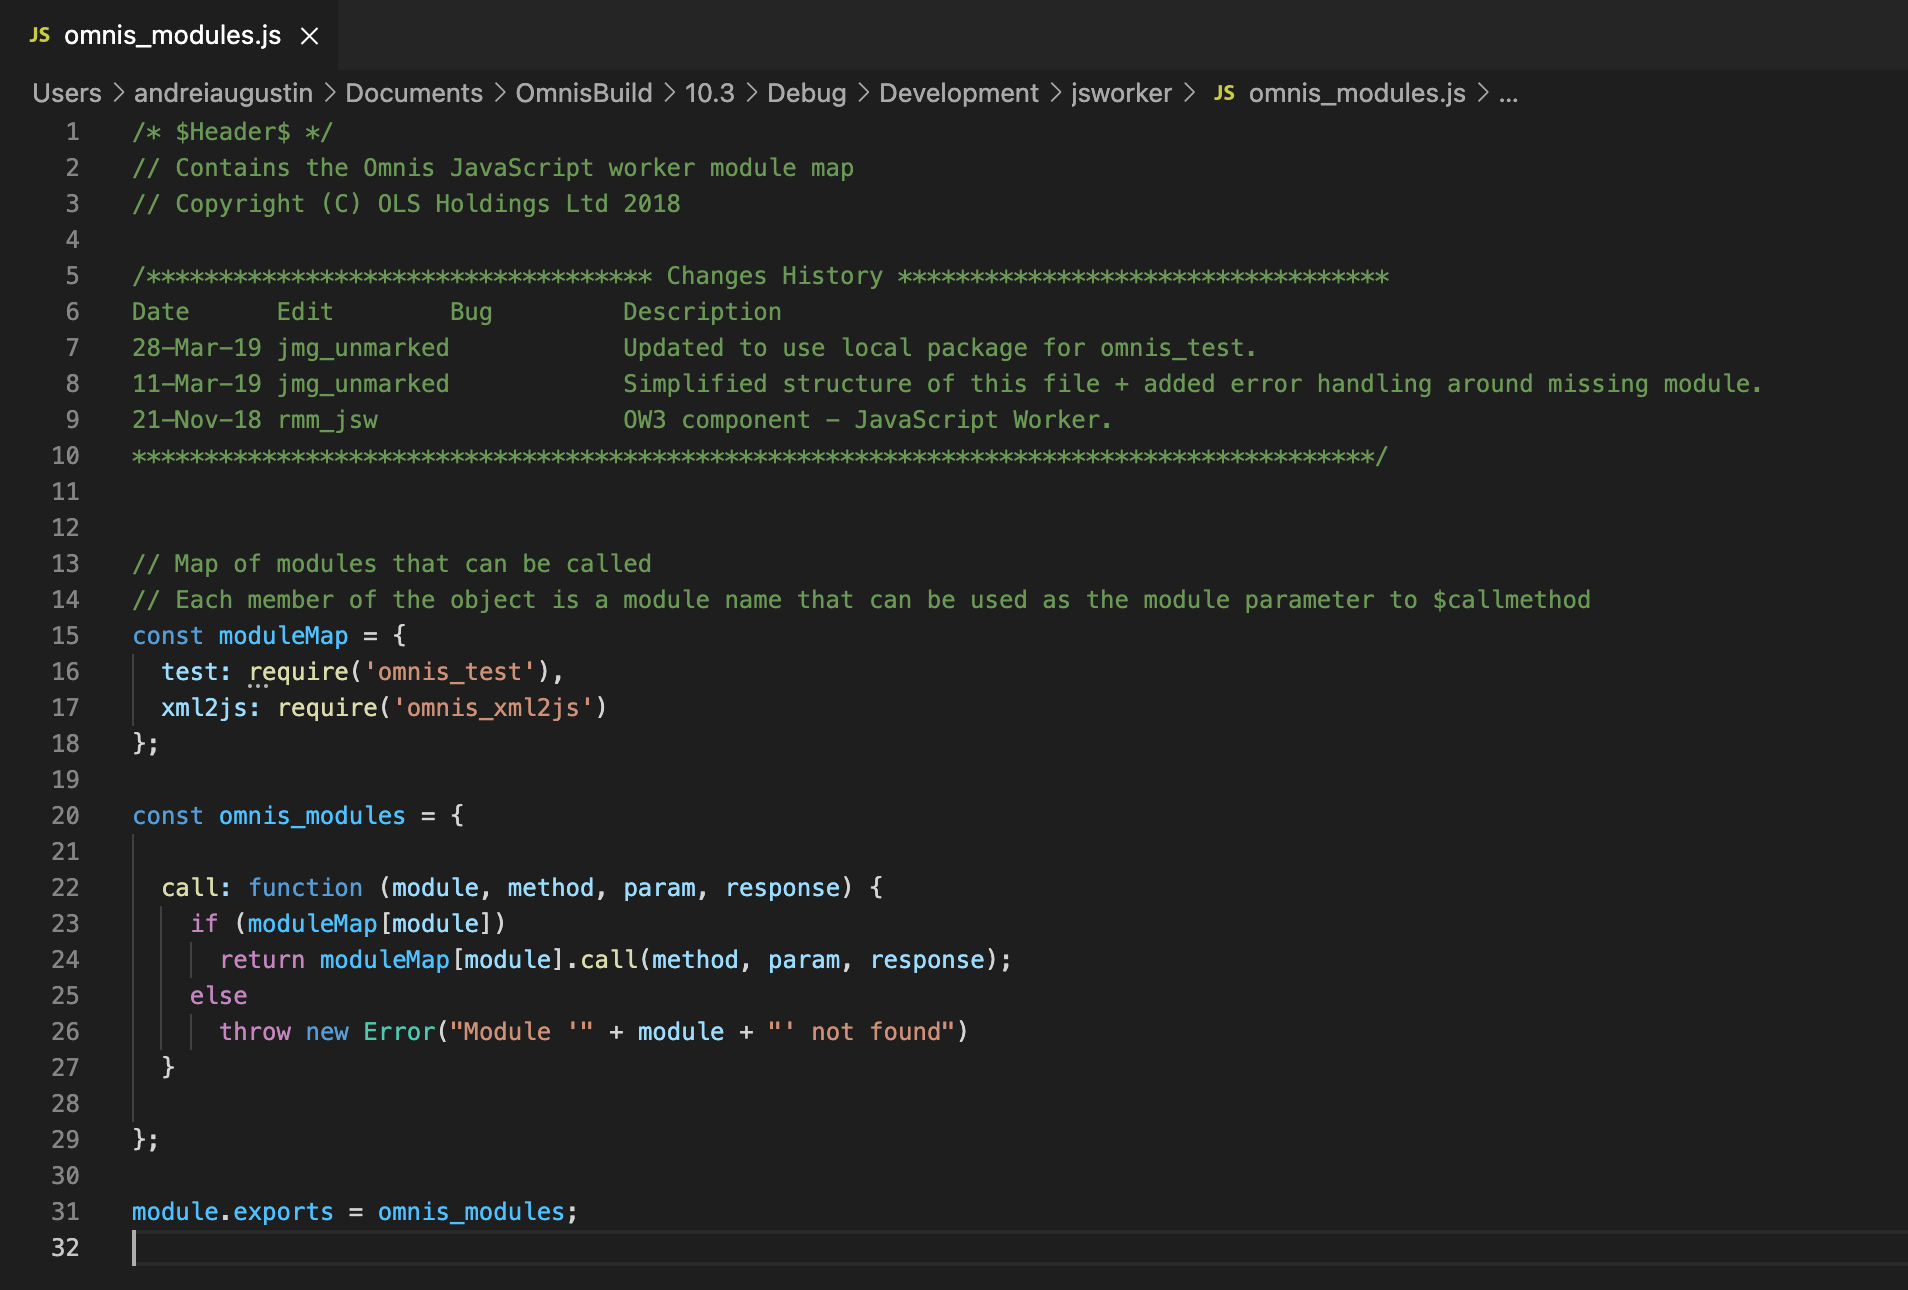
We can see that it starts by declaring the moduleMap object which proceeds to import a couple of JavaScript files such as omnis_test.js and omnis_xml2js.js and assigning them the name test and xml2js, respectively.
For the purpose of this example, we will look at the test module.
test : require('omnis_test')
This line specifies the name of the module which Omnis will refer to when doing $callmethod. Let's look at the function Omnis will call when using $callmethod
const omnis_modules = {
call: function (module, method, param, response) {
if (moduleMap[module])
return moduleMap[module].call(method, param, response);
else
throw new Error("Module '" + module + "' not found")
}
};
We can see that we are passing a few parameters such as module, method, param and response. Method is going to hold the method name we pass in Omnis when we do $callmethod, and param is going to hold the parameters we pass either as a list or row in Omnis when we do $callmethod.
You don't have to worry about the rest of the lines in this file which are simply used to expose the omnis_modules object to Omnis.
Now, let's have a look into our omnis_test.js which is a Node.js module:
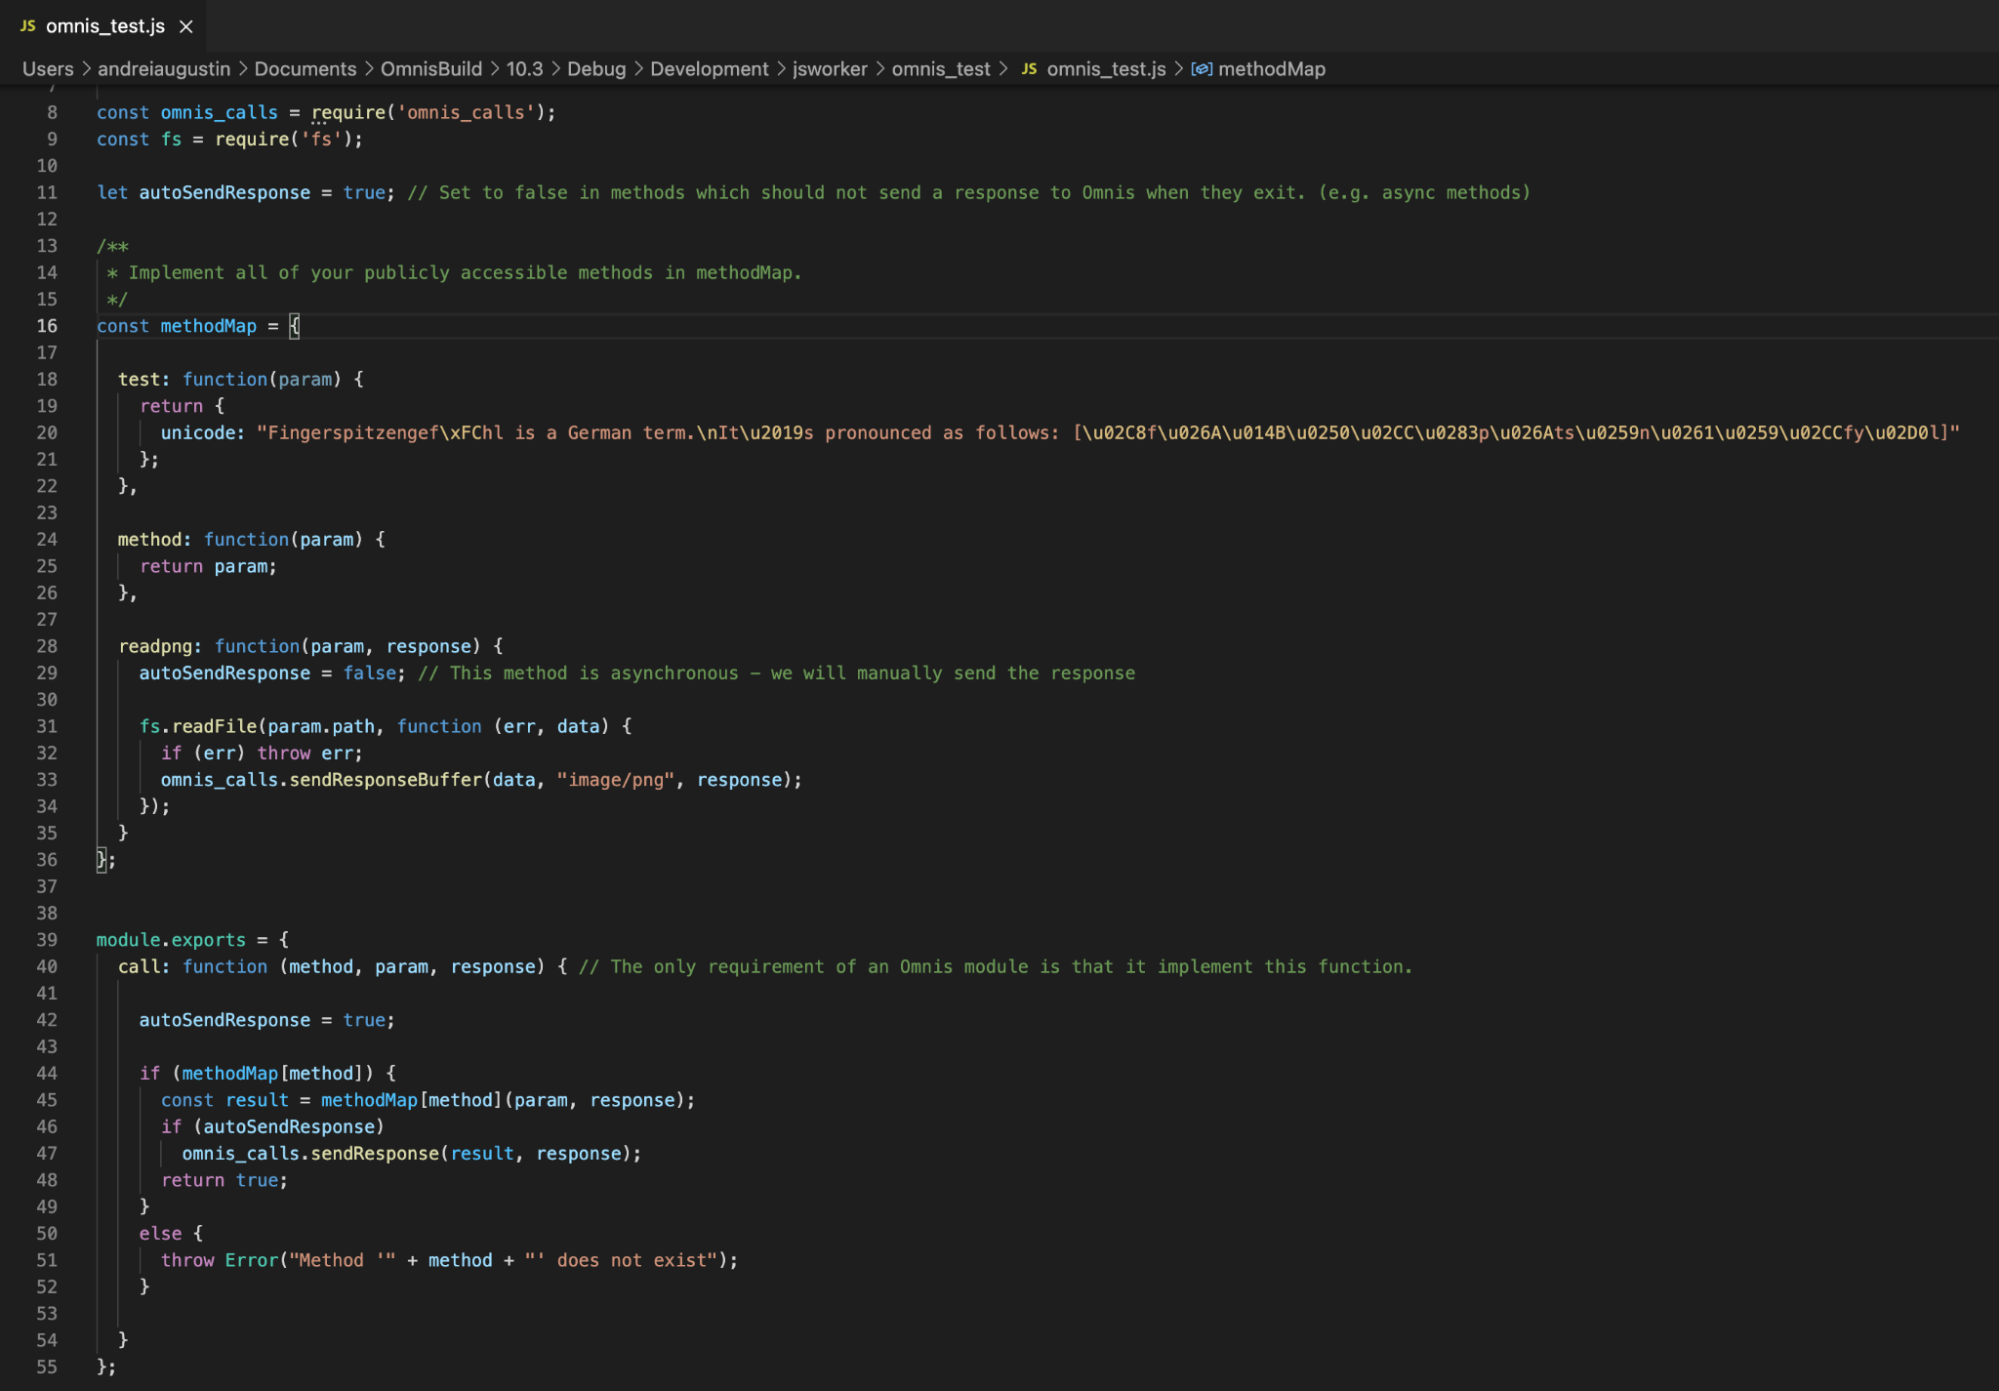
We can see we are importing the omnis_calls.js which is a JavaScript file that handles the communication between your Node.js module and Omnis. You won't have to worry at all about that file, however, we will cover it at the end of this example just to give you more insight on everything that happens in the background.
We can see that here we have an object called methodMap and at the end of the document we are exporting it so Omnis can consume its functions. It is good to note that exporting will be required at the end of your Node.js module in order to provide a map of functions that Omnis can call into.
Let's analyse the test method in our methodMap:
test: function(param) {
return {
unicode: "Fingerspitzengef\xFChl is a German term.\nIt\u2019s pronounced as follows: [\u02C8f\u026A\u014B\u0250\u02CC\u0283p\u026Ats\u0259n\u0261\u0259\u02CCfy\u02D0l]"
};
},
We can see here that the name of our method will be “test”. We can see that it's also taking “param” as a parameter - this should hold the parameters we’ve passed from Omnis. In this case the param is empty, however, it is good to note that we still need to pass an empty list or row from Omnis in order to actually have that 'param' object instantiated, otherwise our code won't work!
Now if we have a look at what the method does, we can see it is returning a new object with a single string value named “unicode”.
Now it would be a good point to introduce the omnis_call.js file for knowledge purposes:
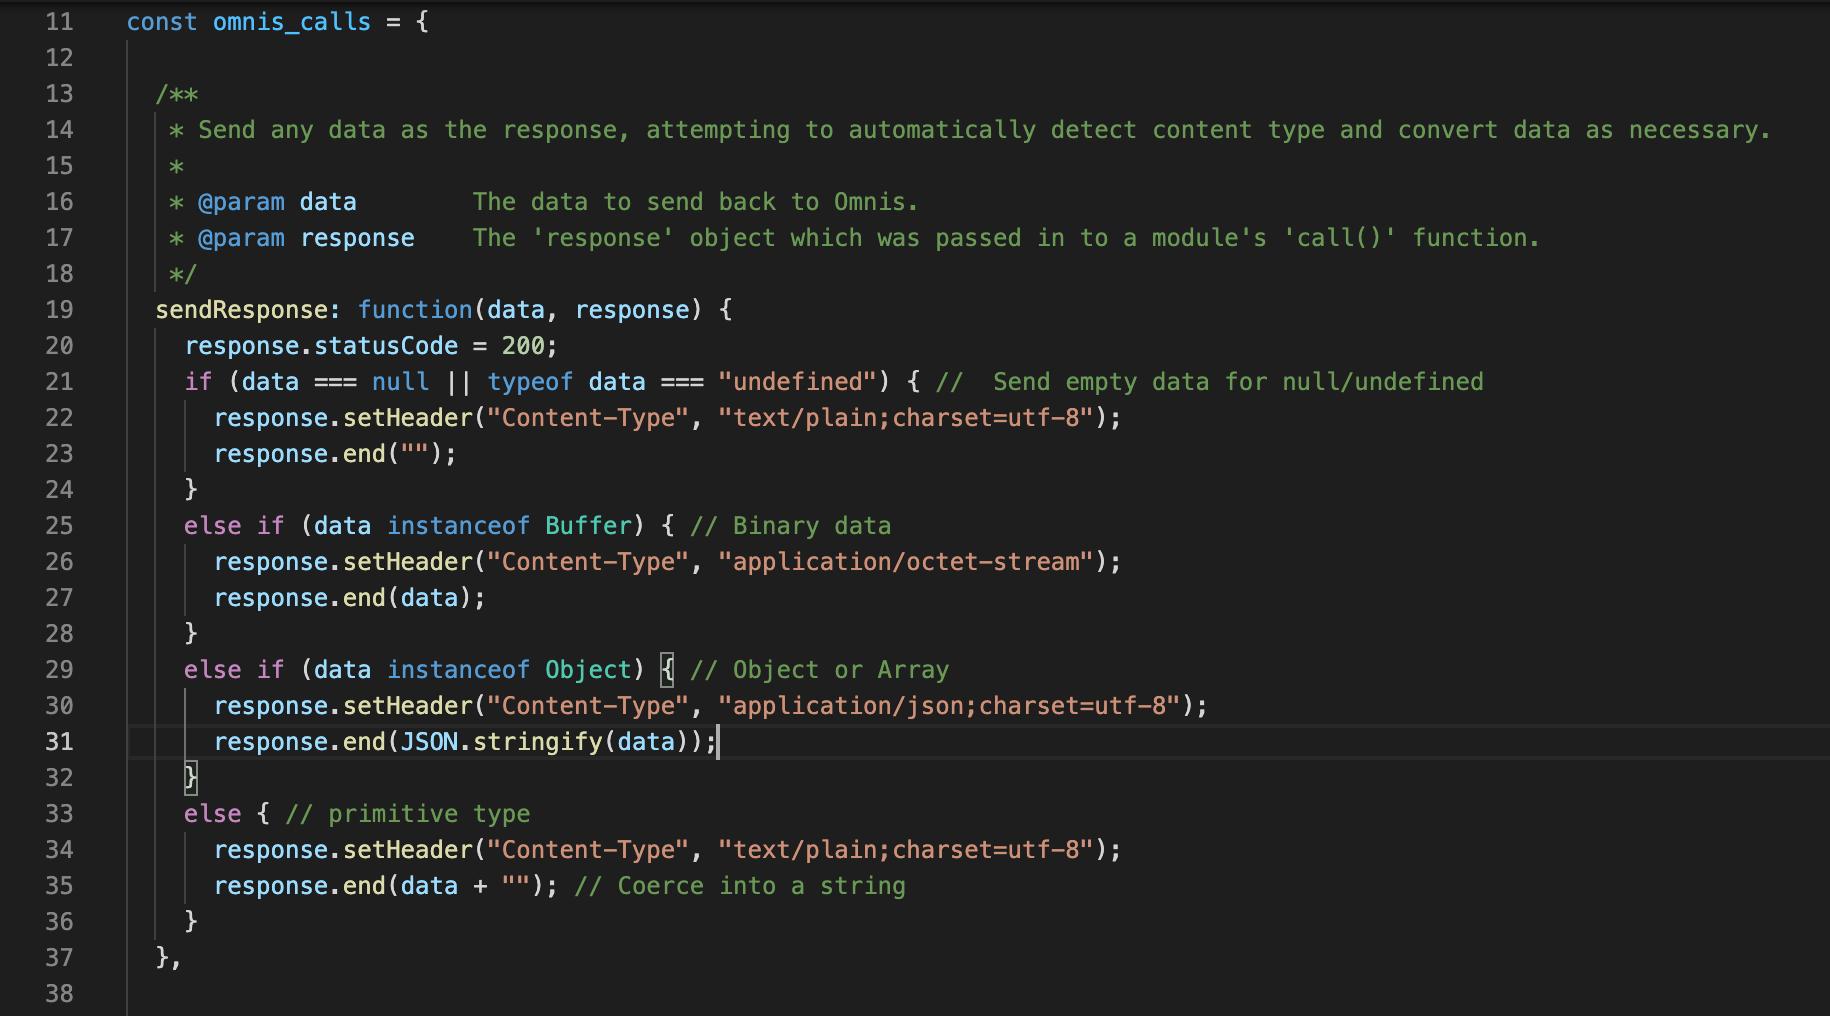
As we can see, the omnis_calls.js file has only three methods, sendResponse which takes a data object and a response object. What sendResponse then does is send the data object back to Omnis and also sends the statusCode of 200 in the response just to let Node.js know that everything went smoothly.
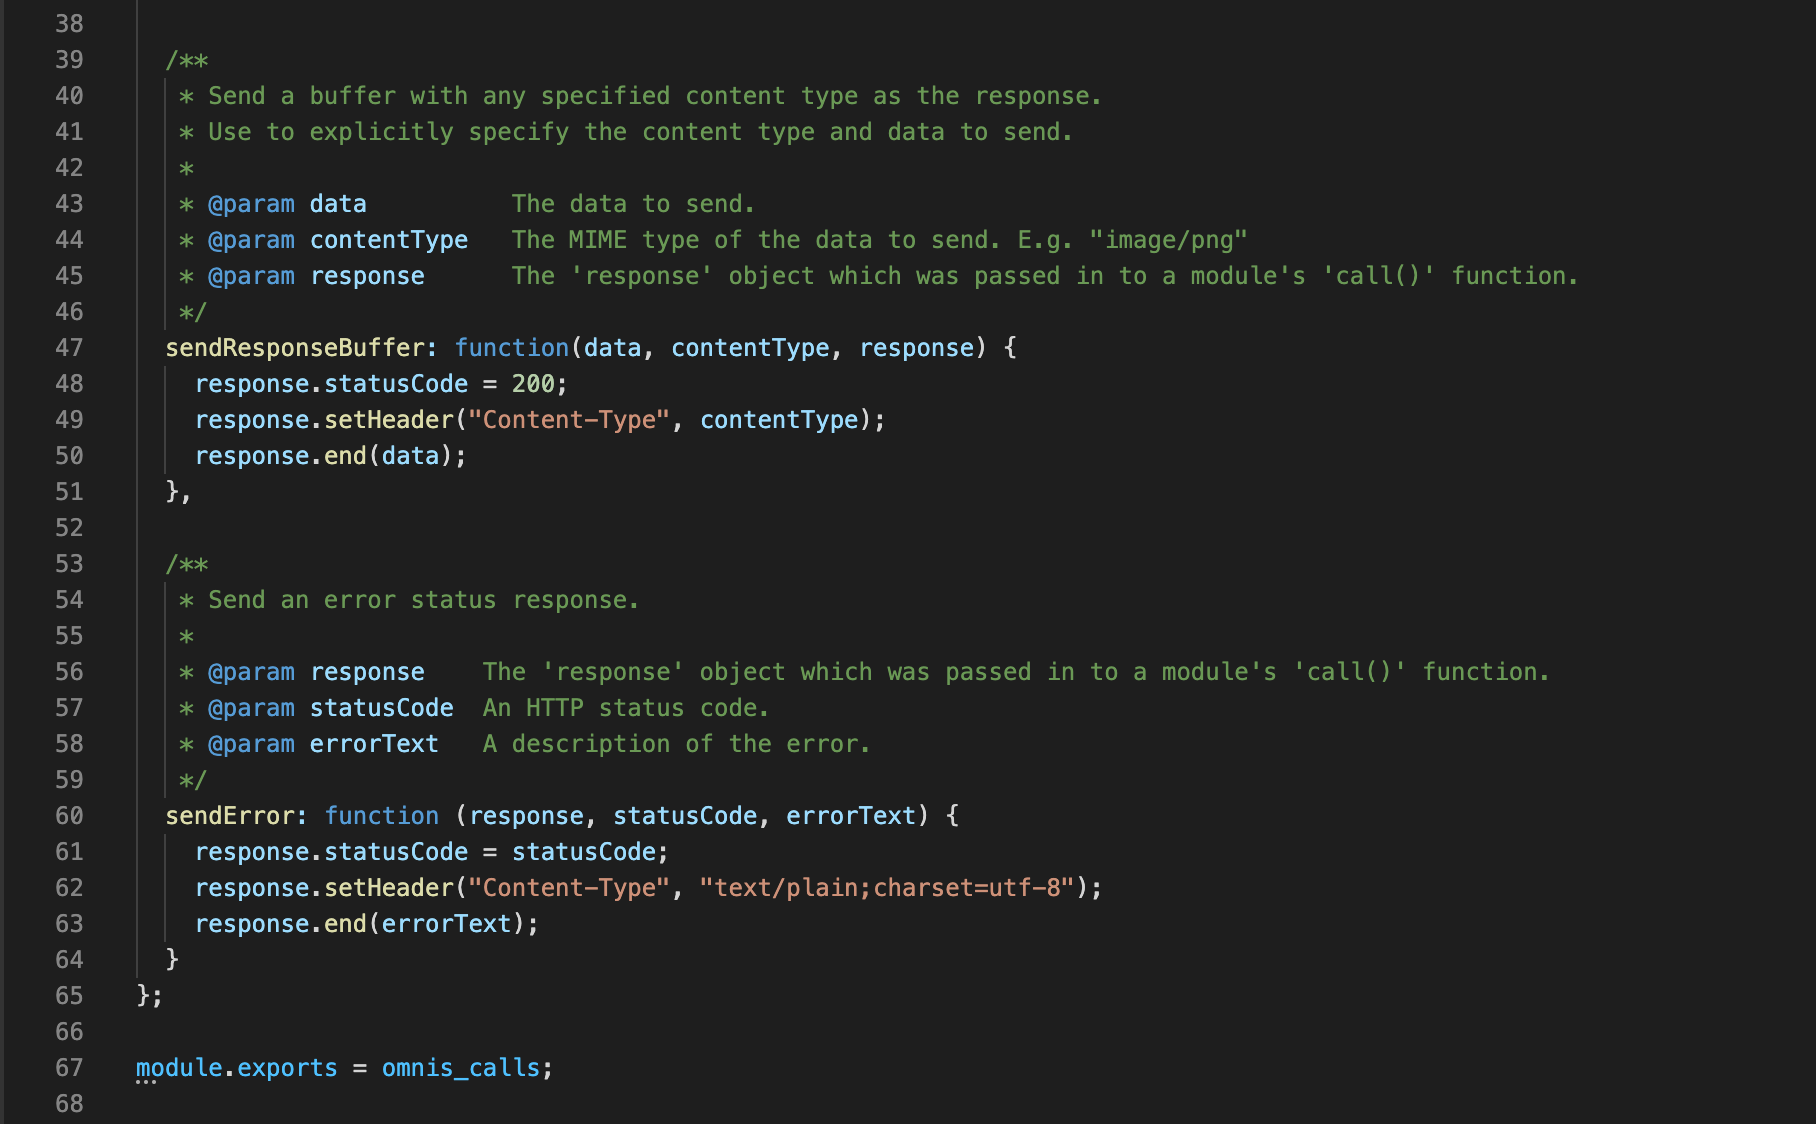
Then we have a sendResponseBuffer which we can use in order to send images and other things, for example. We have an example of that in the readpng method of the omnis_test.js if you wish to test it.
The last method is sendError where we are sending back an error message and an error code for Node.js.
Unless we are developing very advanced Node.js modules to integrate with our Omnis Studio application, it is unlikely we will use the sendError method in our JavaScript code.
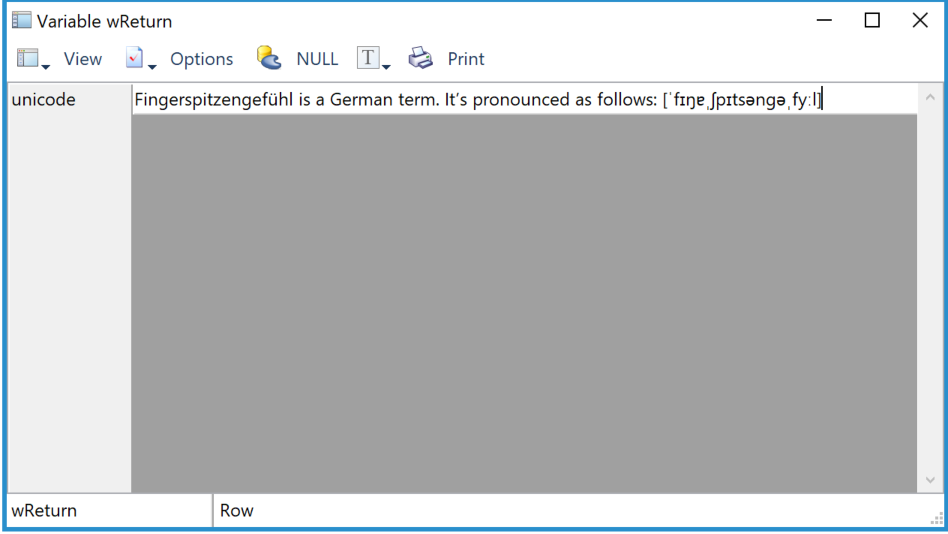
Now that we are aware of all the stuff that goes on in the background, we can make a call from Omnis Studio via $callmethod to the 'test' module and ask for the 'test' method:

And we will see the following returned in the $methodreturn:
Example 2
In this example we will install an npm module and write some JavaScript to make it work with Omnis Studio.
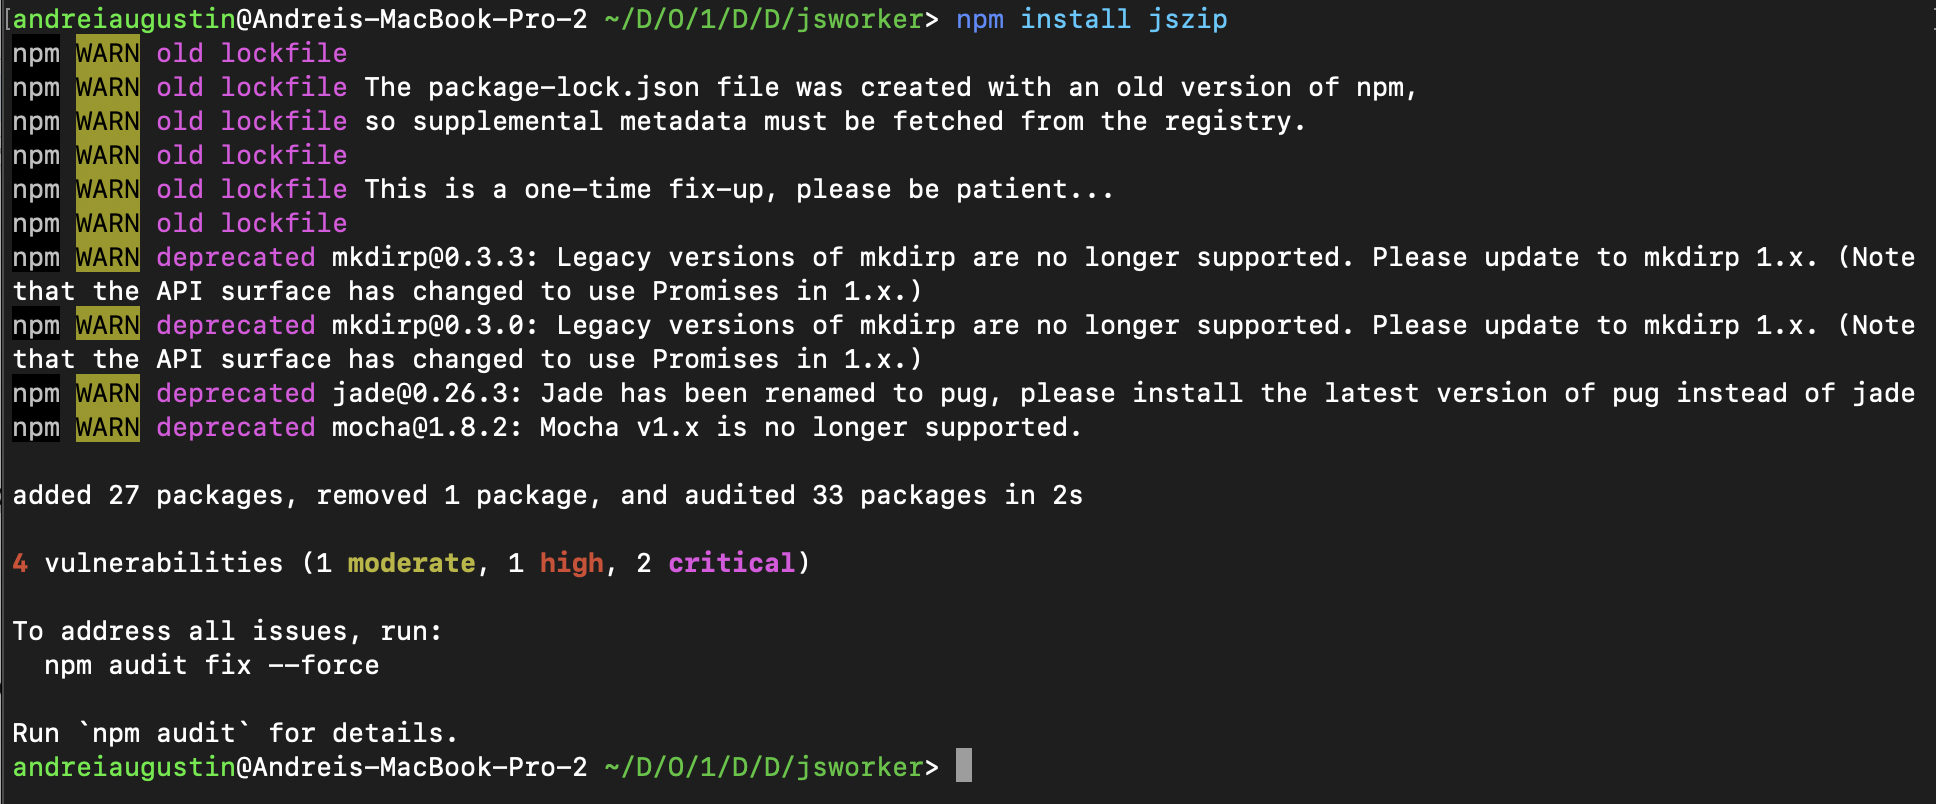
First thing we have to do is fire up our terminal and navigate to the jsworker folder in our Omnis Studio data folder (AppData on Windows platform) and execute 'npm install jszip':
Now we can open our omnis_modules.js and add a new line to the moduleMap:
zip: require('omnis_zip.js')
So moduleMap becomes: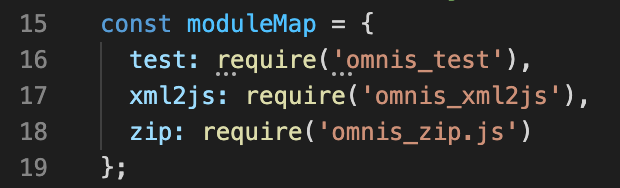
This line is used to include the zip module javascript file into the omnis_modules.js module map. Now, in the same omnis_zip.js file we have a class called moduleMapClass which contains all the functions exposed to Omnis - this should already be pre-populated for this sample, but otherwise you’d need to fill in your own module’s moduleMapClass.
After all this is done, we can move back to Omnis Studio and with the following code we should now be able to run the jszip module (iZipPath will hold the path to a zip file on your computer):Do lRow.$cols.$add("path",kCharacter,kSimplechar)
Calculate lRow.path as iZipPath
Do iJS.$callmethod("zip","loadZip",lRow,kTrue,lErrorText) Returns lOK
Example 3
In this example, we will be installing the request module via npm and write an 'interface' or 'bridge' for Omnis to communicate with the request module and execute a HTTP request to www.google.com and return the status code to Omnis Studio.
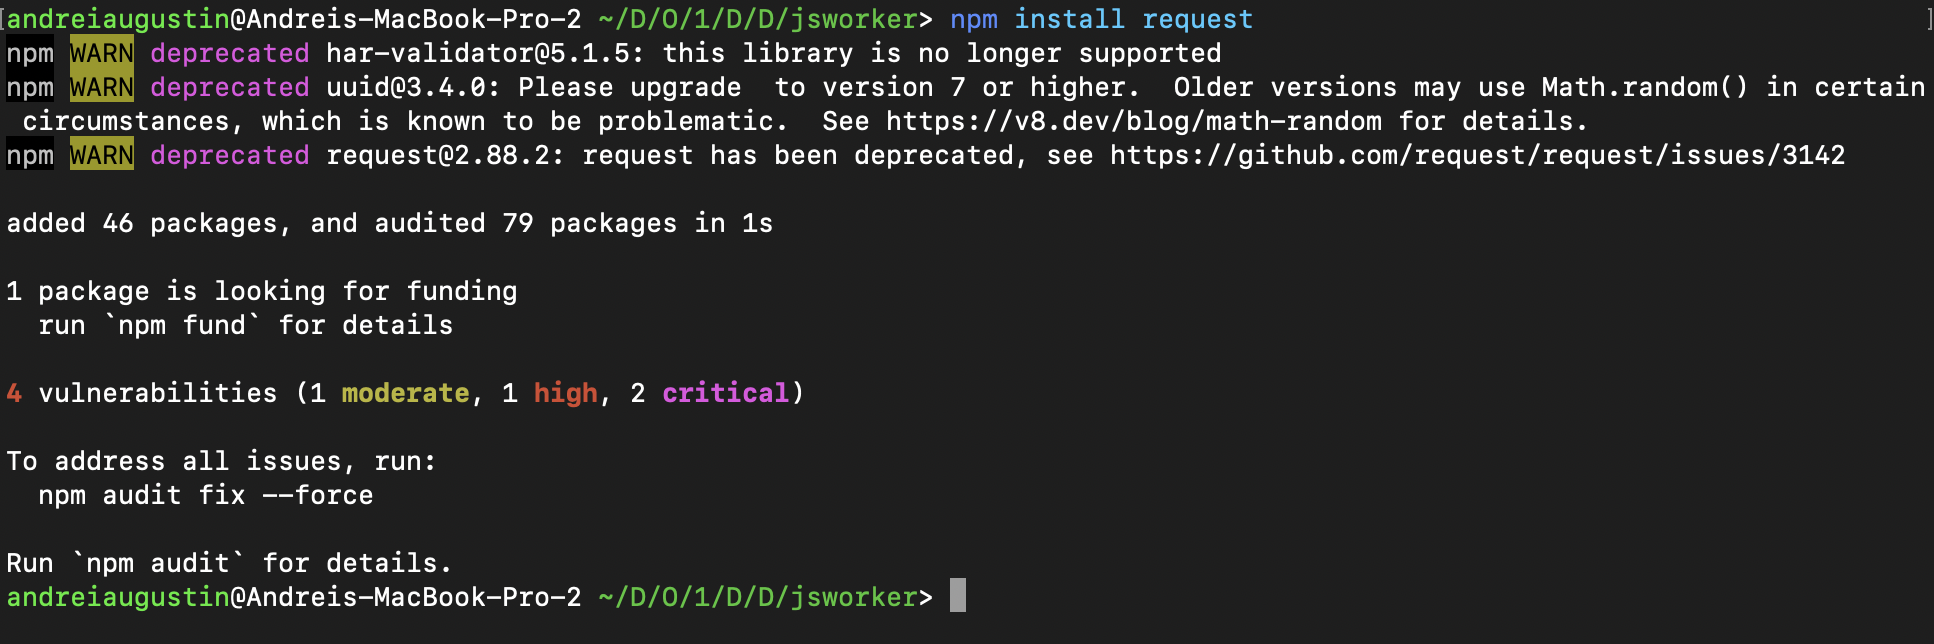
First step we have to fire up our terminal, go to the jsworker folder in the writable directory of Omnis and execute the npm install request as I did here:
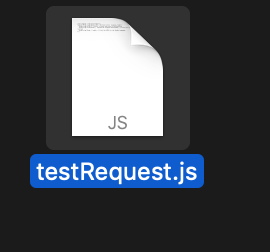
After we have our request Node.js module, we can now create the file that will work as a bridge in between the Omnis JavaScript files and the request Node.js module. Let's create a new file and call it testRequest.js:
In my testRequest.js I added the following code:
//This is required so that Omnis can communicate with our JS file
const omnis_calls = require('omnis_calls.js');
//Here we import the request module
const request = require('request');
//Here we define the methods in the method map class
class methodMapClass {
helloWorld(obj, response) {
request('http://www.google.com', function (error, reqResponse, body) {
obj.statusCode = reqResponse.statusCode;
omnis_calls.sendResponse(obj, response);
});
return true;
}
}
//The following is simply exporting the map of the methods, we need this so Omnis knows what methods we can call, please note that the name of the variable, in this case testRequestModule will be the name of the module we will refer to back in omnis_modules.js
var testRequestModule = {
methodMap: new methodMapClass(),
call: function (method, obj, response) {
return this.methodMap[method](obj, response);
}
};
module.exports = testRequestModule;
From this code, we can see we are importing the omnis_calls.js required for the communication in between Omnis and our Node.js module, and we can see that we are also importing the request Node.js module.
We then have a methodMapClass with only one method called helloWorld.
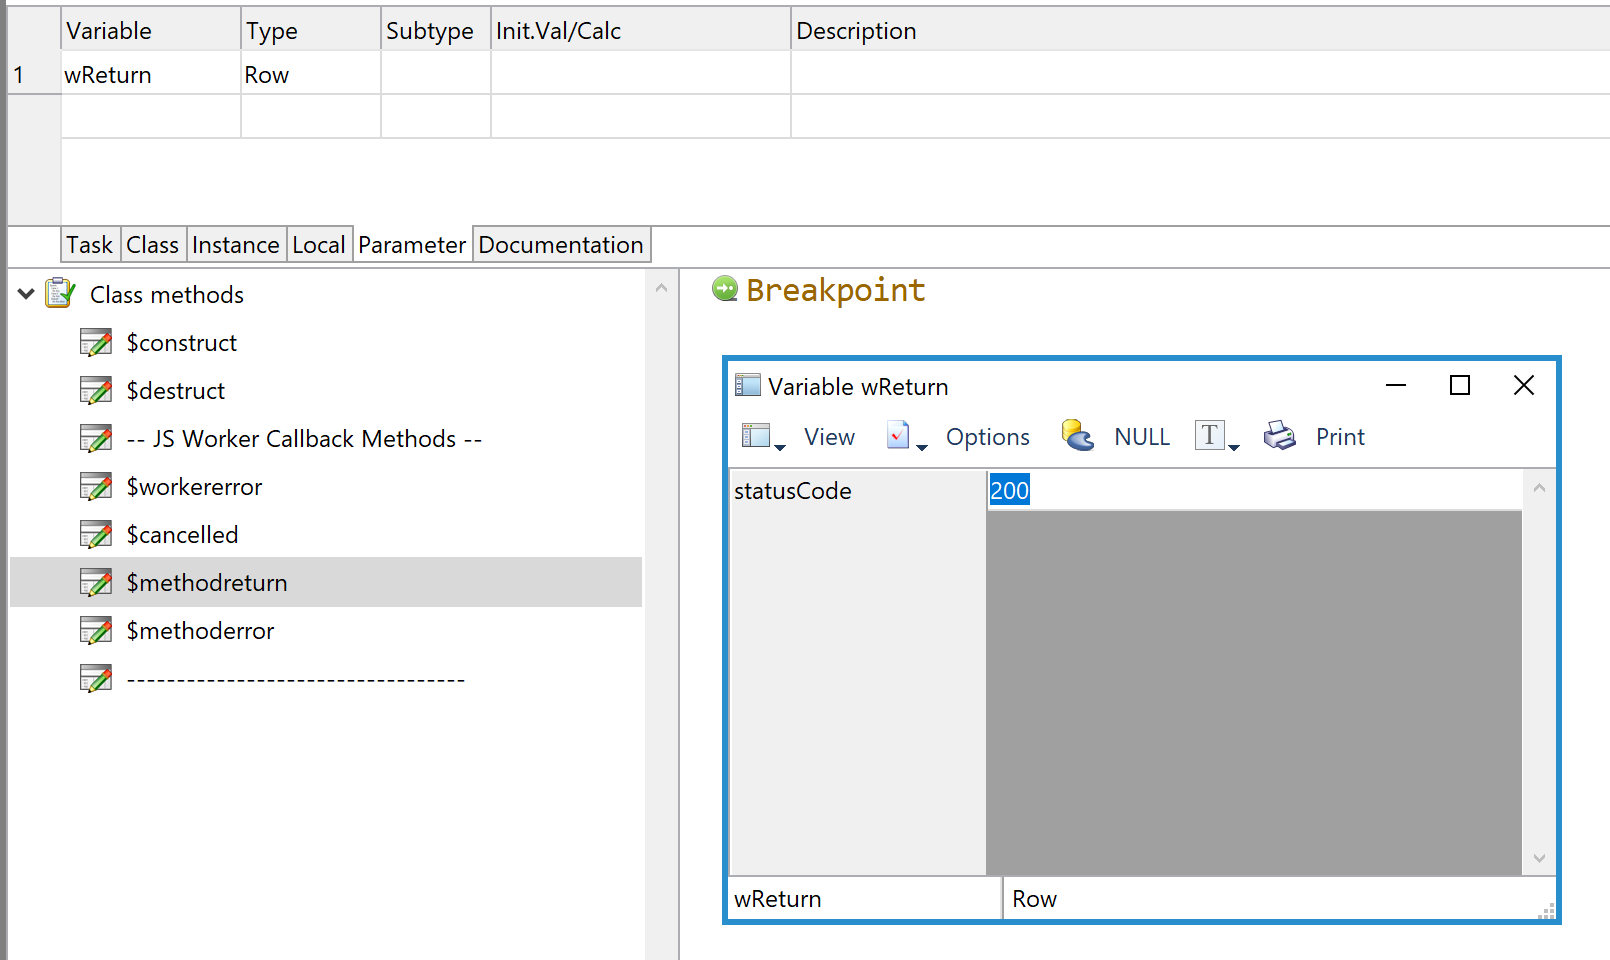
What helloWorld method does is simply executing an HTTP request via the request Node.js module and returning the status code of the request into the statusCode property of our 'obj', it then sends our 'obj' back to Omnis. If the request to www.google.com is successful, we should see a statusCode with a value of 200 returned back to Omnis in the $methodreturn.
Now that we have this all set up, we can specify our testRequest.js as a module in our omnis_modules.js. In order to do that, we add import testRequest and add the required entry in our moduleMapClass in omnis_modules.js which will look like this:
const moduleMap = {
test: require('omnis_test'),
xml2js: require('omnis_xml2js'),
request: require('testRequest.js')
};
const omnis_modules = {
call: function (module, method, param, response) {
if (moduleMap[module])
return moduleMap[module].call(method, param, response);
else
throw new Error("Module '" + module + "' not found")
}
};
module.exports = omnis_modules;
As you can see, we have imported our testRequest.js as testRequestModule and we added a method called request to our moduleMapClass.
If we switch back to Omnis Studio, we should now be able to make a request via $callmethod to the module called request and the method helloWorld:


Please note that I am passing an empty row so that the JavaScript code will have an instance of 'obj'.
Once the code is executed, we should receive the following in our $methodreturn:
Managing automatic return to Omnis
By default, your node.js module will return to Omnis once its function finishes execution.
If you have the need to use async within your node.js module, then you will need to manually handle when your node.js module returns to Omnis. The reason for this is that async functions do not run sequentially, therefore you may find that your node.js module already returned to Omnis before actually finishing an async function call.
This can be achieved by first setting the autoSendResponse variable to false. The variable can be found at the end of your node.js module in module.exports.
Once autoSendReponse is false, the onus is on your node.js module to return back to Omnis when its job is completed. In order to return to Omnis, you can call sendResponse in the omnis_calls module which takes the param and response objects your node.js module received:
omnis_calls.sendResponse(param, response);
param is usually a JSON object which Omnis will receive in form of a Row variable, therefore you could easily add new rows by defining it like so:
param.myNewrow = “hello world”;
If omnis_calls is not defined in your node.js module, this could be because it has not been imported. You can use the line below as an example on how to import other JS modules in node.js:
const omnis_calls = require('omnis_calls');
 Facebook
 Github
 Instagram
 Linkedin
 Twitter
 Youtube
 Please logon or create a free account to download this file.
