Omnis Technical Note TNJS0005Updated Nov 2016
Using the Omnis Synchronization Server
for Omnis Studio 6.1.x, 8.x, or above
(Studio 8.0.2 ZIP added Nov 2016)
By Rod Cooper, Omnis Engineering
The Synchronization Server in the Omnis Studio 6.x/8.x SDK together with the latest JavaScript wrappers provide the ability to synchronize data between a SQLite database on the client device and any supported database on the backend server, including Oracle, MySQL, PostgreSQL, and SQL Server.
This tech note describes how you can test the data synchronization using a demo library and a SQLite demo database. The demo library itself is optimized for iOS mobile devices and the iOS Application Wrapper but could be adapted to work with the other supported platforms.
Requirements
You will need to use Omnis Studio 6.1 or above since it contains the latest Synchronization Server which is required for the syncdemo library and database. In order to create standalone mobile apps (that work off-line in serverless client mode) you need to set the $serverlessclient property in your remote form. To set this property and to be able to build standalone mobile apps that use serverless client mode you will need to use an alternative development serial number – an evaluation serial number can be obtained here, or contact your local sales office to obtain a full development serial number.
The following ZIP files contain the demo library (syncdemo.lbs) and SQLite demo database (syncdemo.db) for different versions of Omnis Studio:
| Studio 6.1.x and 8.0.1 (after conversion): | syncdemo61x.zip |
| Studio 8.0.2 or above* | syncdemo802.zip |
You also need the source for the wrappers from here: http://www.omnis.net/download/jswrapper.jsp
*If you are using Omnis Studio 8.0.2 you will need to use the syncdemo802 library and version 2.3 of the Sync Server which uses a RESTful interface to communicate with mobile clients. When using the new SyncServer 2.3 you now require a Web Services serial number to use the Sync Server in the Development version of Studio 8.0.2 (all Server versions of Omnis include Web Services support). Contact your local sales office for further information.
Setting up the Synchronization server
To connect the Synchronization Server to a database, you must define a session template in the SQL browser. For this example, you should connect to the SQLite database provided.
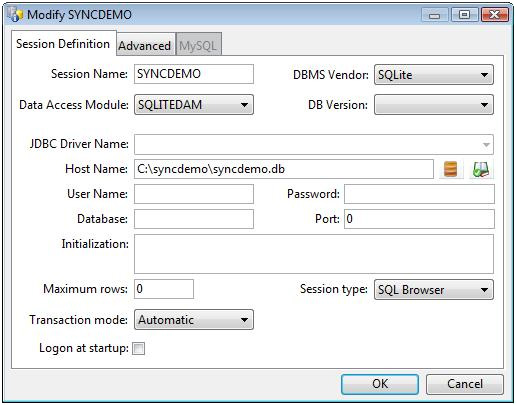
Defining a session template
Select the SQL Browser node in the Studio Browser, click on the Session Manager hyperlink followed by the New Session hyperlink. Define a session template named SYNCDEMO using the entries shown below and press OK to save.
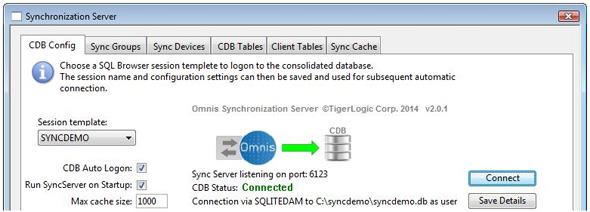
Configuring the Synchronization Server
Open the Synchronization Server in Omnis Studio using the Tools>>Add-Ons menu. On the CDB Config tab select the Session Template SYNCDEMO, then press Save Details followed by Connect.
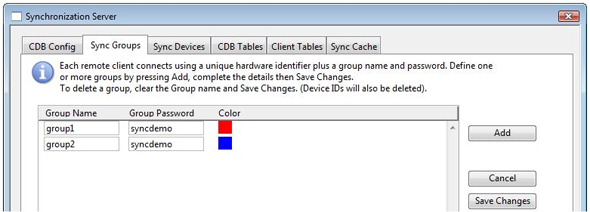
On the Sync Groups tab add two groups named ‘group1’ and ‘group2’ both with a password of ‘syncdemo’ (without quotes).
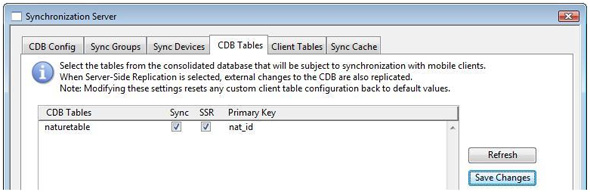
On the CDB Tables tab check Sync and SSR for the Primary Key nat_ID of the table naturetable and press Save Changes.
Testing the connection
If the SQLite connection has been successful the session CDBSESS will be open in the SQL Browser and you will be able to view the data in the syncdemo database by testing the form ‘jsServer’ (right-click on the remote form and select Test Form).
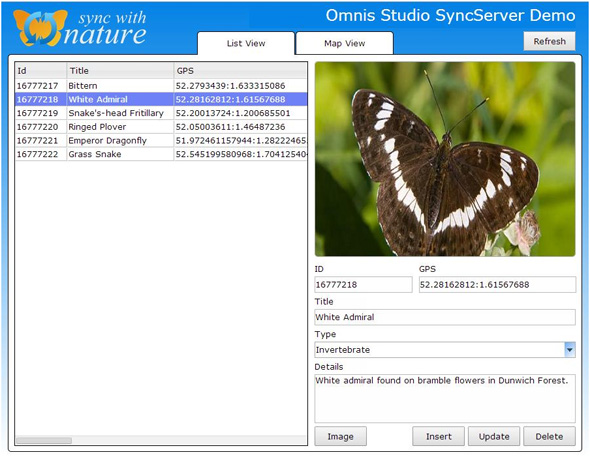
Note, to view data on the Map View tab you must obtain a Google maps apikey and in design mode enter the key into $apikey property of the map control on the jsServer remote form. To do this, open the form ‘jsServer’ in design mode by double-clicking on the form in the Studio Browser, set the current page of the PagedPane to 2, click on the map control and enter your Google api key into the Property Manager under $apikey.
Preparing for client connections
To receive client connections, the Omnis server port on which to listen must be set by selecting ‘Studio 6.x.x’ in the Studio Browser, clicking on the ‘Prefs’ hyperlink and locating the $serverport preference in the Property manager.
Finally, you need to create the html page ‘jsClient.htm’ should the wrapper app be used in online mode. To do this, right-click on the form ‘jsClient’ and select ‘Test Form’, which creates the ‘jsClient.htm’ file automatically in the Omnis html folder and opens it in your web browser. Note that the form will not be fully functional since it is not running on a device, so close the form.
Building the JavaScript Wrapper App
To enable synchronization from a mobile device, you must compile your application into a standalone mobile app using the Omnis JavaScript wrapper, available for iOS and Android. You can download the source and documentation for the wrappers from here: www.omnis.net/download/jswrapper.jsp
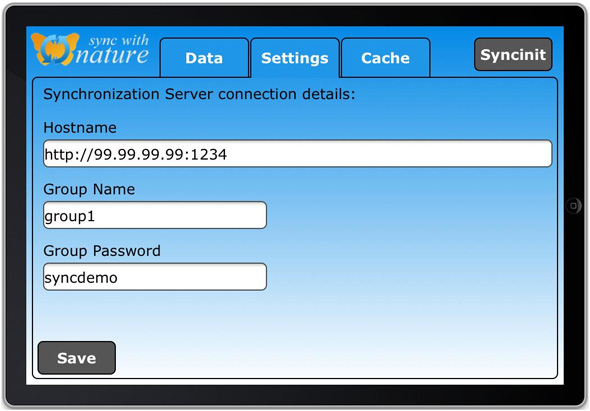
Within the wrapper, set the following entries in the config.xml file where 99.99.99.99 is the IP address of your server and 1234 is the server port (as set up in step 1.4 above), and build the wrapper using the OmnisJSWrapper_SQLite active scheme.
<SettingsOnlineMode>0</SettingsOnlineMode> |
Connecting the Client to the Synchronization server
The first time you run the wrapper app, you will receive a message ‘no such table: naturetable’. This indicates that no tables exist on the client as it has yet to be synced with the server.
On the Settings tab of the client demo app, enter your Hostname together with a Group Name and Password as set up in the Synchronization Server (as above) and press Save.
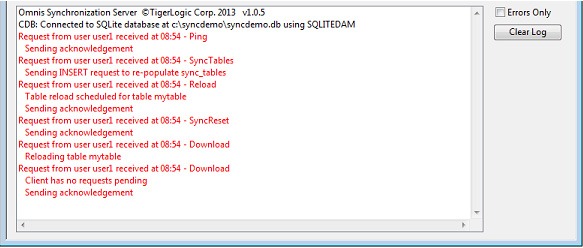
Ensure that the Synchronization Server window is open on the server to view incoming connections, then press the Syncinit button on the client and note the entries in the Synchronization Server log.
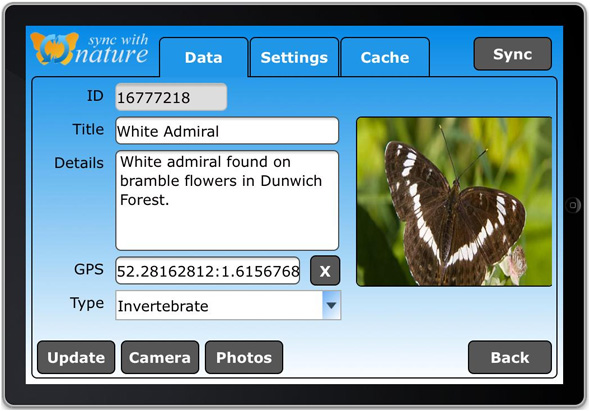
Once synchronization is complete, go to the Data tab on your device, press refresh and note that the data has been synced to your device.

You can add new records or edit existing records within the local SQLite database on the device and then synced to the server by clicking on the Sync button.
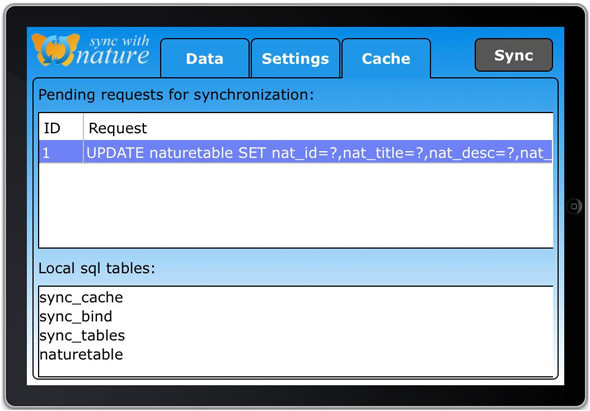
Switching to the Cache tab prior to pressing sync displays the pending requests for synchronization together with a list of local tables on the device. Pressing Sync updates the server database and clears the cache.
If desired this tab can easily be hidden by editing the form 'jsClient' in design and setting the initial value of iShowCache to kFalse.

 Facebook
 Github
 Instagram
 Linkedin
 Twitter
 Youtube
 Please logon or create a free account to download this file.
