Omnis Technical Note TNSQ0024 May 2009
Making Connections using the JDBC DAM
For Omnis Studio
By Chris Stevens and Ian Thurbon
Introduction
The JDBC DAM is provided with Omnis Studio 4.0 and later for the Win32,
Linux and Mac OS X platforms.
This technote describes troubleshooting issues commonly encountered when
attempting to make JDBC connections.
1. Integrity of files
Please ensure that your Omnis Studio installation folder contains the
following files:
| root/Java/Javacode (folder) |
| root/xcomp/javacore.dll (or platform equivalent) |
| root/xcomp/damjdbc.dll (or platform equivalent) |
| root/xcomp/jdbcdam.jar |
2. Java Runtine Environment
Ensure that the Java Runtine Environment (Java SE) is installed on the
client machine and is version 1.4 or higher.
The Java Runtime Environment can be downloaded from www.java.com/en/download/index.jsp
You can verify the version of Java installed on your client machine by
executing the following from the command line:
| java -version |
3. Omnis Environment
Ensure that the environment variable: OMNISJVM is defined and points to
the installation of the Java Virtual Machine (JVM) you wish to use. The
Java Virtual Machine is normally located in the bin/client
folder of your JRE installation. For example:
| OMNISJVM = C:\j2sdk1.4.2_16\jre\bin\client\jvm.dll for
the SDK, or OMNISJVM = C:\jrel1.4.2\bin\client\jvm.dll for the JRE installation. |
If the Java Virtual Machine cannot be located when Omnis starts up, there will be a corresponding error message in the Trace Log, in which case you should check that the path to the jvm.dll (jvm.so) is correct, then re-start Omnis.
OMNISJVM does not need to be set for the Mac OS X platform.
4. Locating JDBC Drivers
Ensure that the CLASSPATH environment variable is set and points to the
required driver file(s).
Where the 'oracle.jdbc.driver.OracleDriver' exists inside the classes12.zip file and the 'com.sybase.jdbc3.jdbc.SybDriver' exists inside the jconn3.jar file, the CLASSPATH environment variable should contain the following:
CLASSPATH = "C:\jdrivers\jConnect-6_0\classes\jconn3.jar; c:\jdrivers\classes12.zip" |
You should consult the documentation accompanying your JDBC driver to determine the filename containing the driver file and/or the corresponding driver name (see point 6 below).
CLASSPATH does not need to be set for the Mac
OS X platform.
The JRE automatically looks in the /Library/Java/Extensions
folder for JDBC drivers.
5. Clientware
This step does not apply to more recent (Type 4) JDBC drivers, but to
older Type 1,2 & 3 drivers.
Older types of JDBC drivers usually require additional DBMS clientware
to be installed on the client machine. The JDBC driver connects through
this clientware to the DBMS.
Please consult your driver documentation to determine the type of driver
supplied and whether or not additional clientware is required. (The drivers
referred to in this technote are Type 4 drivers and require no additional
software).
6. Set the JDBC driver name
Ensure that the myJDBCObj.$drivername property has been set to the required
driver name, for example:
Do myJDBCObj.$drivername.$assign('oracle.jdbc.driver.OracleDriver')
The JDBC DAM also provides a $setdriver() method which can be used in preference if desired.
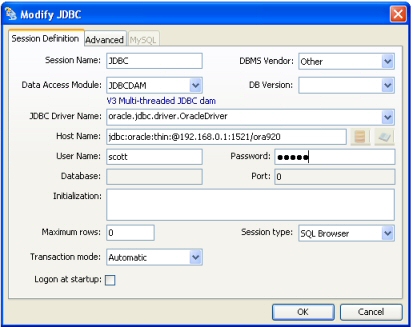
7. Set the Hostname
Finally, ensure that the Hostname parameter specified when calling myJDBCObj.$logon()
is formatted correctly.
Most drivers use a URL format to pass the relevant information to the
driver. For example, a typical Type 4 driver might use a URL such as:
jdbc:oracle:thin:@host:port/service
Do myJDBCObj.$logon('jdbc:oracle:thin:@192.168.0.1:1521/ora10g', 'scott',
'tiger', 'mySession')
When using the SQL Browser, this connection information would look similar
to:
Further Information
- Further information regarding the Oracle JDBC Driver and connections can be found on the Oracle JDBC FAQ page: http://www.orafaq.com/wiki/JDBC
- A list of Java recommended drivers is available at http://developers.sun.com/product/jdbc/drivers
- The Java Runtime Environment can be downloaded from www.java.com/en/download/index.jsp
- This Technote was compiled using the Oracle 'classes12.zip', 'oJDBC5.jar' and Sybase 'jconn3.jar' Type 4 JDBC drivers as examples. We currently do not certify any specific drivers for use with the JDBC DAM.

 Facebook
 Github
 Instagram
 Linkedin
 Twitter
 Youtube
 Please logon or create a free account to download this file.
